|
|||
|
Home > Learn > Why Is Exposure So Important? > Using Reflected Light Meters, Part Two Using Reflected Light Meters, Part Two:
Bugling Elk, Rocky Mountain National Park, Colorado
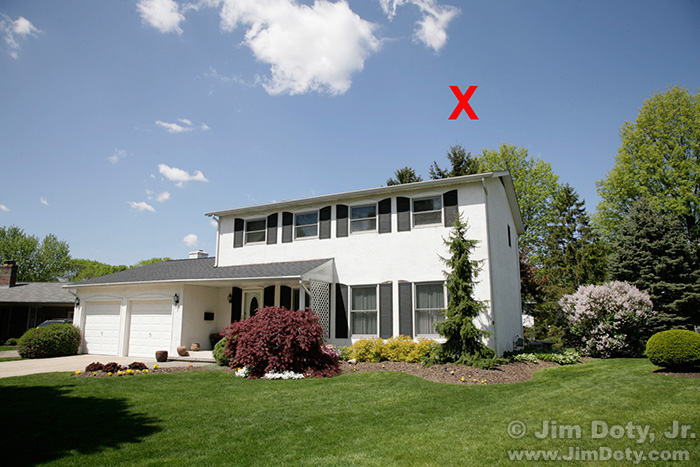
One solution is to meter the whole scene and hope the camera gets it right, but that isn't very precise. If the tones in the scene don't average out to a "medium tone" (see Part One), your photo won't come out looking like the scene. You could use an incident light meter, or meter a gray card, both of which would give you an accurate exposure provided your primary subject isn't very light or very dark. Of you can meter the right tone in the scene and use that for your exposure for the whole scene. That's what this page is all about. The best way to learn how to do this is to go out and experiment. You will need a camera and something to take notes. 1. Pick a bright sunny day and chose a scene that has a range of tones in sun and shade. You need at least one large white subject in the scene. 2. Put your camera in aperture priority mode (AV), set the lens aperture to f/11, and the ISO to 100. 3. Go around and meter all of the individual subjects in the scene. Write down each subject and the shutter speed the meter recommends. When you meter, be sure and fill the frame with each subject so the meter isn't fooled by other subjects. 4. Back up so you can photograph the whole scene. Put your camera in manual mode (M), set your aperture to f/11, and take one picture for each shutter speed on your list of subjects. 5. When you get done, look at the photos and compare them to your notes. You should end up with a series of photos that look something like the following photos. In each photo, I indicate the subject that was metered with a red "X".
White House #1, Metered for the White Garage Doors: f/11, 1/640 sec.
White House #2, Metered for the White Cloud: f/11, 1/400 sec.
White House #3, Metered for the Green Window Bushes: f/11, 1/160 sec.
White House #4, Metered for the Blue Sky (upper right): f/11, 1/100 sec.
White House #5, Metered for the Sunlit Grass: f/11, 1/50 sec.
White House #6, Metered for the Grass in the Shade: f/11, 1/5 sec. When I did this simple exercise, I also metered several other subjects in the scene, but 6 photos shown here are enough to get the idea of what is going on. This exercise reinforces several points from Part One of this article. 1. Reflected light meters do their best to turn whatever you meter into a medium toned subject. 2. The lighter the subject you meter, the darker the overall photo will be. 3. The darker the subject you meter, the lighter the overall photo will be. 4. Metering a subject that is close to a medium tone (like the green bushes in front of the windows in White House #3) will usually give you the best overall exposure. This series of photos also illustrates some additional points. For years I've read that clear blue northern sky and green grass are medium in tone and can be used as the exposure for the overall scene. If green grass and blue sky were always medium in tone, that would be good advice, but they aren't always medium in tone and they aren't in this scene. The blue sky in this scene is one stop darker than a medium tone, so the overall photo is lighter than in the original and the sunlit white tones of the house are washed out. The green grass in the sunlight is 2 stops darker than a medium tone, so the overall photo is much lighter and the house is seriously burned out. In photographic terminology, we have "burned out highlights" which is usually a photographic no-no. If we didn't have a large white subject burned out subject in this scene, the exposure in photo 4 would work just fine. In my experience, blue sky and green grass vary so widely in tonality (see Part One) as to be unreliable as a consistent guide to a medium tone in a photographic scene. The Bottom Line When you have a wide range of subjects with a variety tonalities, meter a medium toned subject, lock in the exposure and then photograph the whole scene. What if You Don't Have a Medium Tone? If you don't have a medium toned subject in your scene, or your medium toned subject isn't big enough to meter accurately, pick one tone in the scene and use exposure compensation to make it the right tonality (see Part One) and all of the other tones will fall into place. Here's an example.
Upper Tahquemenon Falls, Winter, Michigan's Upper Peninsula Most of the tones in this scene are much lighter or darker than a medium tone. The way to meter this scene is to (1) zoom in on the brightest snow to the left, (2) meter the snow, (3) add two stops of light to what the meter tells you, (4) lock in the exposure, (5) zoom back out to take in the whole scene and (6) take the photo. Adding 2 stops of light to the snow makes for nice, bright snow. If you add 2 1/2 stops of light, the snow is in danger of burning out. Digital cameras vary in terms of when the highlights burn out, so do some testing with your camera. With slide film, adding 2 stops should work just fine. For the photo of the bugling elk, you could meter the sunlit part of the elk's dark fur and subtract a stop of light, making it a dark tone, or you could simple meter the sunlit grass and lock in that exposure to keep the grass medium in tone and let the elk go dark. Either approach would work.
Speaking Your Camera's Exposure Language: Aperture, Shutter Speed, and ISO Using Reflected Light Meters, Part One Using Reflected Light Meters, Part Two Simplify Your Life with an Incident Light Meter Turn Your Camera Meter Into An Incident Light Meter: Using an ExpoDisc Using a Gray Card, Incident Light Metering on the Cheap The RAW versus Jpeg Exposure Advantage
More Information The most detailed information about metering, camera meters, and other metering tools is in my book, Digital Photography Exposure for Dummies.
December 22, 2010 |
|
Copyright © Jim Doty, Jr. All rights reserved. |
|
|
|
||||||||||||||||||||||||